Updating Klipper
Updating after a Klipper version update
This guide explains how to update the firmware on your printer’s microcontrollers after a Klipper update: the mainboard MCU and the toolhead MCU.
After some Klipper updates, the communication protocol between host and MCU changes, and older MCU firmware can become incompatible, which triggers errors in Mainsail until you reflash the affected MCU(s).
Updating Klipper itself follows the usual, well-documented Klipper workflow and is not something special or “FreeDi-specific”. However, since this project is also aimed at beginners (and because it’s simply nice to have the right settings for your exact printer model at hand), I decided to provide this page as a practical step-by-step reference for everyone.
My hope is that it helps you quickly confirm your model-specific menuconfig options and get back to printing with less guesswork.
Info
If everything works and you don’t miss features, you can absolutely stay on your current version.
But if you updated Klipper and now see MCU mismatch/protocol errors, this page is the “get back to printing” checklist.
When do I need this?
Typical symptoms in Mainsail (Console / Klipper errors) are messages like “MCU Protocol error” and hints that this is frequently caused by running older firmware on the MCU(s), recommending recompiling and reflashing.
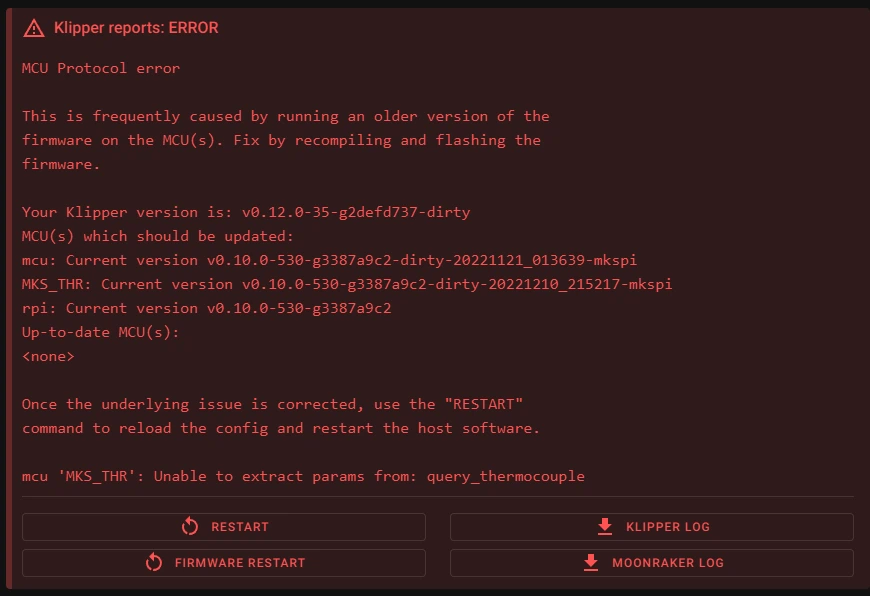
This can happen right after Klipper updates, even if your printer was perfectly fine before.
Don’t panic!
These errors are fixable by updating the firmware on the listed MCU(s).
If you’re unsure whether it’s the mainboard or toolhead that needs an update: Mainsail usually tells you which MCU(s) should be updated.
Updating the Mainboard MCU
These steps are the same for all supported printers
STEP 1: Compile the mainboard firmware
Building Klipper for the mainboard:
To build the klipper.bin file, run:
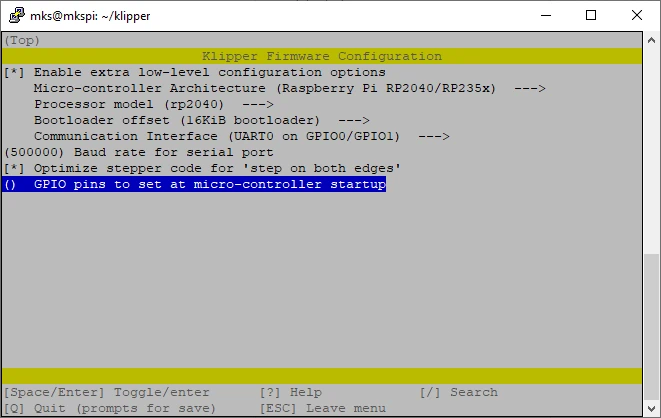
cd ~/klipper
make menuconfig
Set everything according to this screenshot:
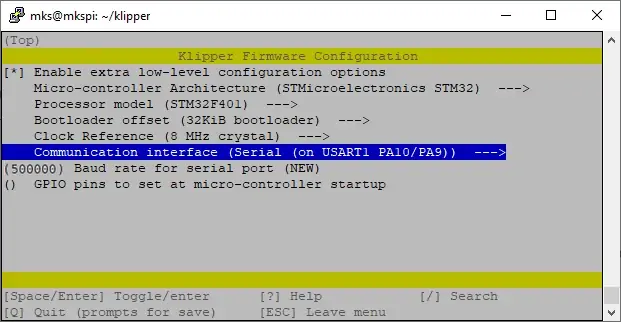
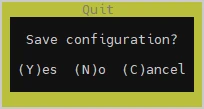
Quit with Q and save with Y
Now we clean the workspace first and then compile with all 4 cores:
make clean
make -j4
This will generate the klipper.bin file in the /home/mks/klipper/out/ folder.
STEP 2: Copy & rename the firmware file
for X3 Series printers:
- the file must be renamed as X_4.bin
- To do this, run:
cp ~/klipper/out/klipper.bin ~/klipper/out/X_4.bin
for Q1 pro & Plus 4 printers:
- the file must be renamed as qd_mcu.bin
- To do this, run:
cp ~/klipper/out/klipper.bin ~/klipper/out/qd_mcu.bin
Tip
I recommend using cp (as shown) instead of mv, so you keep the original klipper.bin as a fallback.
STEP 3: Flash the mainboard firmware
You have two valid ways to flash the mainboard. Pick A or B.
Way A (classic): Flash via microSD (like first installation)
Flashing Klipper to the mainboard:
Use your favorite program to copy the file you just renamed from the printer into your computer (e.g. WinSCP or Mobaxterm).
Then:
-
Format a microSD card as FAT32
-
Copy the .bin file in this microSD
-
Shut your printer down and wait at least 30sec.
-
Put the microSD card into the slot of the printer's mainboard.
-
Turn the printer on.
TIP: The mainboard MCU (STM32F402) will now be flashed, which takes about 10 seconds, but make sure to let your printer powered ON for 1 minute, just to be sure.
- Remove the microSD Card from the printer
Way B (no SD handling): Flash via SPI using Klipper’s Method
By letting a microSD card inserted in your mainboard, you can flash your mainboard mcu over SPI using Klipper’s built-in script. This is based on Klipper’s SDcard update workflow, using flash-sdcard.sh.1
Danger
Use the original script included with Klipper !!! not a random copy!!!
for X3 Series printers
For X-Max 3 run:
sudo systemctl stop klipper
~/klipper/scripts/flash-sdcard.sh -f ~/klipper/out/X_4.bin -b 500000 /dev/ttyS0 qidi-x-max3
For X-Plus 3 run:
sudo systemctl stop klipper
~/klipper/scripts/flash-sdcard.sh -f ~/klipper/out/X_4.bin -b 500000 /dev/ttyS0 qidi-x-plus3
For X-Smart 3 run:
sudo systemctl stop klipper
~/klipper/scripts/flash-sdcard.sh -f ~/klipper/out/X_4.bin -b 500000 /dev/ttyS0 qidi-x-smart3
Tip: the last parameter can be any of them for X3 series, because the mainboards functions are identical.
- Restart Klipper:
sudo systemctl start klipper
for Q1 pro & Plus 4 printers:
For Q1 Pro run:
sudo systemctl stop klipper
~/klipper/scripts/flash-sdcard.sh -f ~/klipper/out/qd_mcu.bin -b 500000 /dev/ttyS0 qidi-q1-pro
For Plus 4 run:
sudo systemctl stop klipper
~/klipper/scripts/flash-sdcard.sh -f ~/klipper/out/qd_mcu.bin -b 500000 /dev/ttyS0 qidi-plus4
Tip: the last parameter can be any of these two. It doesn’t matter which one you use because the Q1 pro & Plus 4 mainboards functions are identical.
- Restart Klipper:
sudo systemctl start klipper
Toolhead MCU update (model-specific)
Warning
This part depends on your printer model, so follow the right instructions for your printer.
**Note: the above parameters are for FreeDi V2.08 with Klipper v0.13.0-69.
X3 Series users steps
X3 Series toolhead update with Katapult:
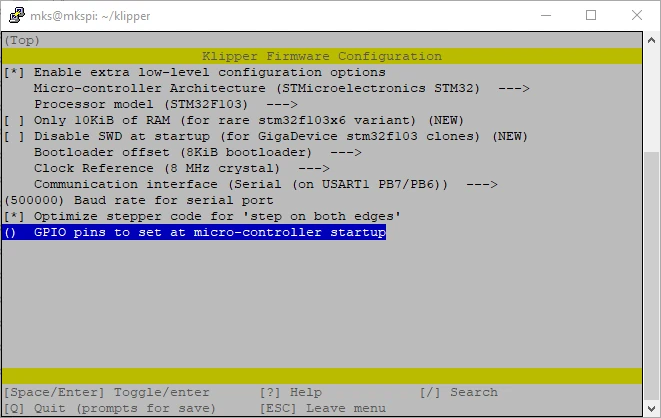
- Compile the toolhead board firmware with:
cd ~/klipper
make menuconfig
Set it according to the screenshot below:

Save and exit with Q then Y
Then run:
make clean
make -j4
This generates a klipper.uf2 file in ~/klipper/out/.
- Find your toolhead ID with:
ls /dev/serial/by-id/*

- Flash your toolhead with Katapult, replacing the ID with yours:
sudo service klipper stop
python3 ~/katapult/scripts/flashtool.py -f ~/klipper/out/klipper.uf2 -d /dev/serial/by-id/usb-katapult_rp2040_C5DA4D951E145858-if00
-
If the update is successful, you should see this:
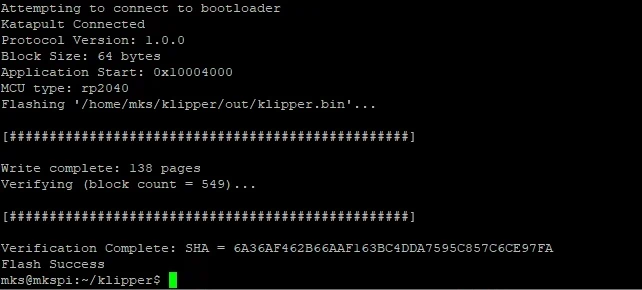
-
Restart Klipper:
sudo systemctl start klipper
X3 Series toolhead update without Katapult:
- Compile the toolhead board firmware with:
cd ~/klipper
make menuconfig
Set it according to the screenshot below:
Save and exit with Q then Y
Then run:
make clean
make -j4
This generates a klipper.uf2 file in ~/klipper/out/.
Bring the toolhead into "RP2 Boot" mode:
- Remove the back cover of the tool head.
- Press and hold the "boot“ button.
- Press and release the "reset“ button.
- Release the "boot“ button.
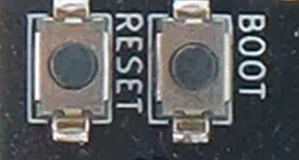
- Find the right RP2 partition by running:
lsblk
In my case I found it identified as: sda1.
Run the following command (replace sda1 by yours):
sudo cp ~/klipper/out/klipper.uf2 /dev/sda1
Q1 Pro users steps
Bonus!
Since Katapult was installed during the FreeDi setup, you can update the toolhead without using the USB breakout cable anymore!
Yes — that whole “extra wiring / breakout” step is gone now, and I’m honestly happy about it, making your experience easier!
Q1 pro toolhead update:
- Compile the toolhead board firmware with:
cd ~/klipper
make menuconfig
Set it according to the screenshot below:
Save and exit with Q then Y
Then run:
make clean
make -j4
This generates a klipper.uf2 file in ~/klipper/out/.
- Flash your toolhead with Katapult:
sudo service klipper stop
python3 ~/katapult/scripts/flashtool.py -f ~/klipper/out/klipper.uf2 -d /dev/ttyS2
-
If the update is successful, you should see this:
-
Restart Klipper:
sudo systemctl start klipper
Plus4 users steps
Bonus!
Since Katapult was installed during the FreeDi setup, you can update the toolhead without using the ST-Link v2 anymore!
Yes — that whole “extra wiring / breakout” step is gone now, and I’m honestly happy about it, making your experience easier!
Plus 4 toolhead update:
- Compile the toolhead board firmware with:
cd ~/klipper
make menuconfig
Set it according to the screenshot below:
Save and exit with Q then Y
Then run:
make clean
make -j4
This generates a klipper.bin file in ~/klipper/out/.
- Flash your toolhead with Katapult:
sudo service klipper stop
python3 ~/katapult/scripts/flashtool.py -f ~/klipper/out/klipper.bin -d /dev/ttyS2
-
If the update is successful, you should see this:
-
Restart Klipper:
sudo systemctl start klipper
Troubleshooting tips
If the mcu error persists after flashing:
- reboot the printer once, then rcheck Mainsail again to find which MCU(s) is still listed as incompatible.
If you’re stuck in a loop after a major Klipper update:
- it’s usually because one MCU was updated but another one is still on an older firmware:
- Mainboard AND Toolhead must match the host expectations.
If you want a sanity-check:
- compare your
make menuconfigscreen with the reference screenshots for your version and model, then rebuild and flash again.
Last resort:
X3 series & Q1 Pro owners can have a look here to try to "reset" the toolhead: Toolhead Troubleshooting
If this doesn't help,take a screenshot of the exact Mainsail error and ping the community - we'll get you back to printing!
Restore FreeDi original toolheads firmwares
In case something goes wrong, you can flash your toolhead back to the versions included with FreeDi.
Restore FreeDi's toolhead firmware on X3 printers
- Find your toolhead ID with:
ls /dev/serial/by-id/*
- replacing the ID with yours, run:
sudo service klipper stop
python3 ~/katapult/scripts/flashtool.py -f ~/FreeDi/mainboard_and_toolhead_firmwares/v0.13.0-154/Toolhead_X3.uf2 -d /dev/serial/by-id/usb-katapult_rp2040_C5DA4D951E145858-if00
- Restart Klipper:
sudo systemctl start klipper
Restore FreeDi's toolhead firmware on Q1 printers
Run:
sudo service klipper stop
python3 ~/katapult/scripts/flashtool.py -d /dev/ttyS2 -f ~/FreeDi/mainboard_and_toolhead_firmwares/v0.13.0-154/Toolhead_Q1_klipper.bin
- Restart Klipper:
sudo systemctl start klipper
Restore FreeDi's toolhead firmware on Plus 4 printers
Run:
sudo service klipper stop
python3 ~/katapult/scripts/flashtool.py -d /dev/ttyS2 -f ~/FreeDi/mainboard_and_toolhead_firmwares/v0.13.0-154/Toolhead_Plus4_klipper.bin
- Restart Klipper:
sudo systemctl start klipper
Huge Thanks to benlye for the awesome integration of X-7 boards to
flash-sdcard.sh:
X-7 boards requestHere's my follow-up which added the integration of the X-6 boards from other printers:
X-6 boards request