OS & Firmware Setup
This tutorial is taken from the "FreeQIDI" guide, originally made by C0co before FreeDi, for the X3 Series QIDI printers.
Following these steps, you'll go through the manual installation of the system and flashing steps.
DISCLAIMER
Caution!
Before you start, please understand that you will wipe the entire disk and install a different OS.
You will also update all sub-systems (Toolhead THR board and Mainboard STM32F402 MCU) to the latest klipper. So you will have an entirely free and custom 3D printer.
Please note, that this will all be done at your own risks, and please do not contact the QIDI support if you have any issues. By making these changes, you will lose your warranty in this regard.
There is however a "recovery“ image, that can restore your QIDI printer to its factory state. You have to downgrade the THR toolhead board, the mainboard MCU, and the screen, and you are basically back to factory settings and you should have your warranty back!
Getting started
Please follow the steps below carefully! Come to our Discord channel if you run into an issue.
Installing the OS (Armbian)
Thanks to redrathnure 1 there is a great Armbian based OS that we can use as a foundation. So download the latest Armbian MKSPI release to get started.
OS Installation:
- Turn your printer off, wait ~30s.
- Open the back cover and remove the EMMC flash.
- Use BalenaEtcher or Win32 disk imager and flash the armbian image to your EMMC using your adapter.
- Insert the EMMC back to your printer.
- Turn your printer ON and connect the printer via ethernet cable to your router.
Connect to your printer via SSH using its IP address and log in with these credentials:
user: root
password: 1234
You will be asked to create a new user, so create it using these:
user: mks
password: makerbase
Now start a new SSH session and login with the new credentials.
Update the system with:
sudo apt update
sudo apt upgrade
Installing Klipper
Now we need to install Klipper and all the dependencies with KIAUH 2.
Install KIAUH:
sudo apt-get update && sudo apt-get install git -y
cd ~ && git clone https://github.com/dw-0/kiauh.git
./kiauh/kiauh.sh
Use KIAUH to install these softwares in this order:
-
1: Klipper
-
2: Moonraker
-
3: Mainsail
If you do have a webcam, also install Crowsnest.
When asked for the python version, make sure to select python v3.x.!
Now you should be able to access your printer via a web browser, and see the Mainsail web interface.
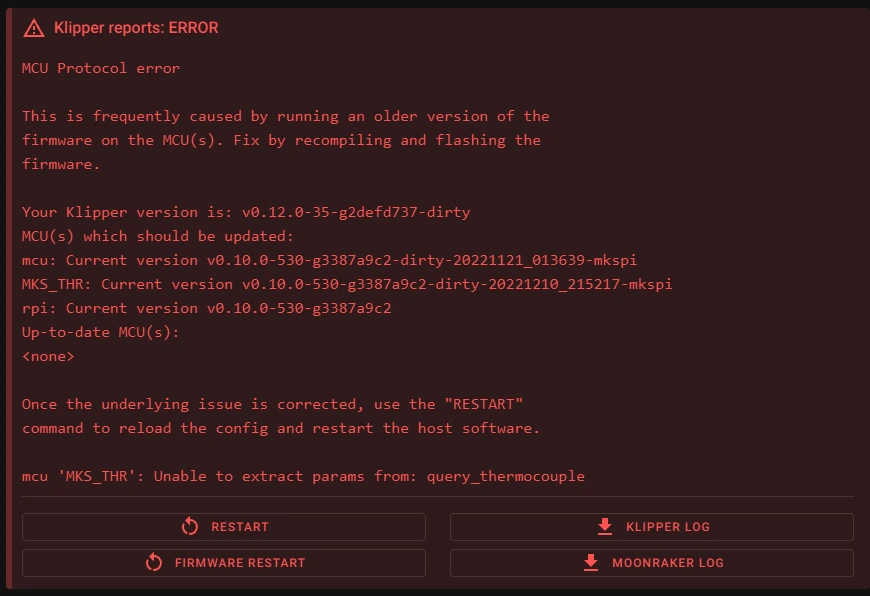
It will show you an error like this:

This is because the boards are not updated with the latest klipper firmware yet.
Flashing the mainboard MCU
This step is the same for all supported printers
Building Klipper for the mainboard:
To build the klipper.bin file, run:
cd ~/klipper
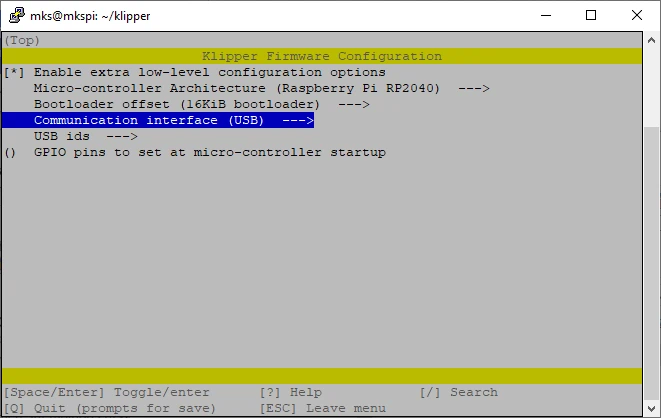
make menuconfig
Set everything according to this screenshot:
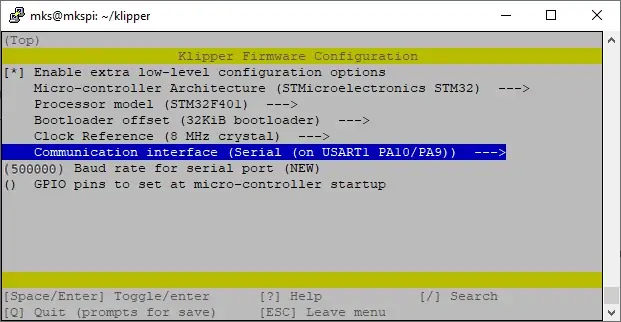
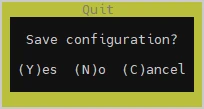
Quit with Q and save with Y
Now we clean the workspace first and then compile with all 4 cores:
make clean
make -j4
This will generate the klipper.bin file in the /home/mks/klipper/out/ folder.
Flashing Klipper to the mainboard:
Use your favorite program to copy this file from the printer into your computer (e.g. WinSCP or Mobaxterm).
Then:
-
Format a micro SD card as FAT32
-
Copy the klipper.bin file to this SD-card and rename it:
- For 3 series printers, rename it as: X_4.bin
- For Q1 & Plus 4, rename it as: qd_mcu.bin
- For 3 series printers, rename it as: X_4.bin
-
Shut your printer down and wait at least 30sec.
-
Put the microSD card into the slot of the printer's mainboard.
-
Turn the printer on.
TIP: The mainboard MCU (STM32F402) will now be flashed, which takes about 10 seconds, but make sure to let your printer powered ON for 1 minute, just to be sure.
- Remove the microSD Card from the printer
Flashing the Toolhead MCU
The toolheads use a derivate of MKS THR boards. These boards are powered by RP2040 microcontrollers on X3 series & Q1 pro, and by STM32 microcontrollers on Plus 4.
To be able to flash your toolhead, you will need to turn it into what is called "DFU mode" first.
During this tutorial we will do this once. In the future, this won’t be necessary anymore. Because the bootloader named "katapult“ 3 (formerly known as CanBoot) brings the ability to put microcontrollers in DFU mode without the need of manual intervention.
Installing katapult
Connect via SSH to your printer.
Katapult needs python3-serial dependency so run:
sudo apt install python3 python3-serial
Clone the Katapult repository:
git clone https://github.com/Arksine/katapult
Run these commands to configure the Katapult firmware:
cd ~/katapult
make menuconfig
configuring Katapult for X3 series:
First, make sure to build a katapult deployment application with the right settings:
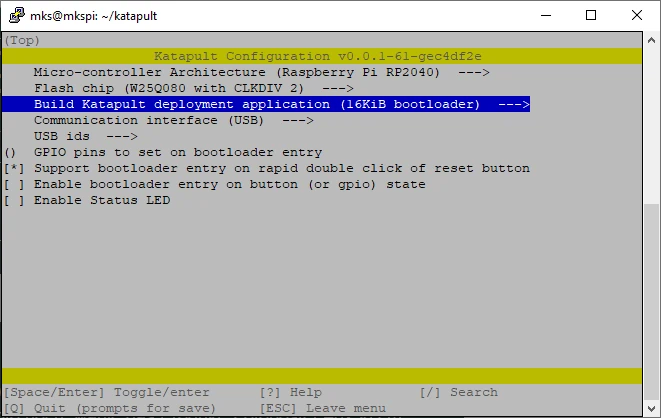
Finish by hitting Q and save with Y:
configuring Katapult for Q1 pro:
First, make sure to build a katapult deployment application with the right settings:
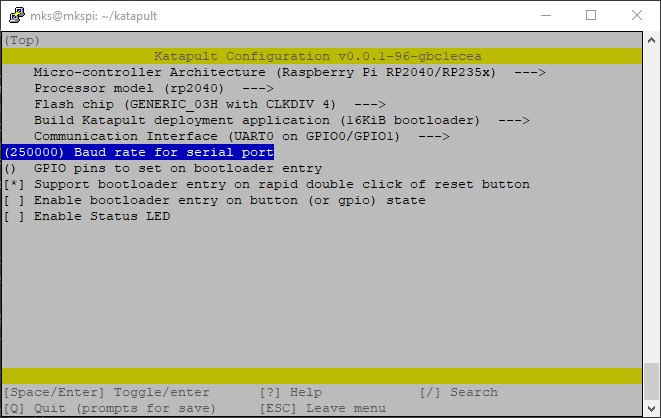
Finish by hitting Q then save with Y:
configuring Katapult for Plus 4:
First, make sure to build a katapult deployment application with the right settings:
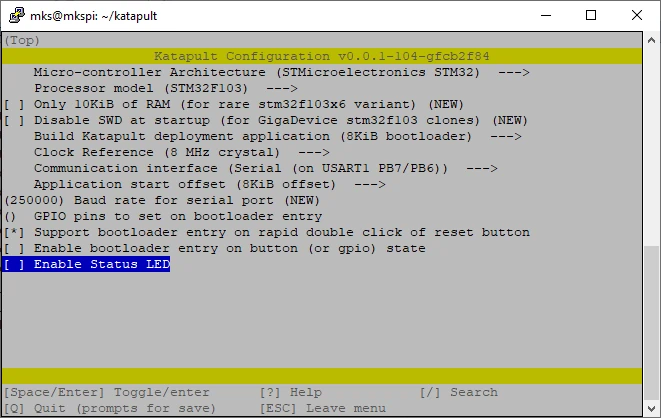
Finish by hitting Q and save with Y:
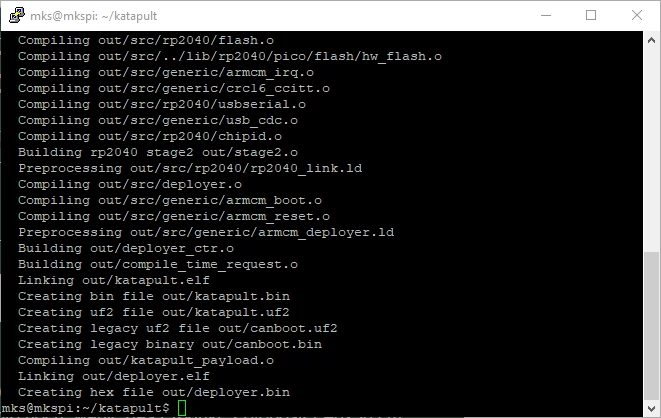
Building the katapult bootloader:
Now build the firmware by first cleaning the workspace and then compile with all 4 cores:
make clean
make -j4
-
X3 series & Q1 pro will use
katapult.u2fcreated inside the /Katapult/out folder. -
Plus 4 will use
katapult.bincreated inside the /Katapult/out folder.
Flashing katapult on X3 series:
Put the toolhead board in DFU mode by doing this:
- Remove the back cover of your toolhead.
- Press and hold the "boot“ button.
- Press and release the "reset“ button.
- Release the "boot“ button.

To confirm your toolhead is in boot mode run:
lsblk
You should see an sda partition. Below the boot partition is sda1:
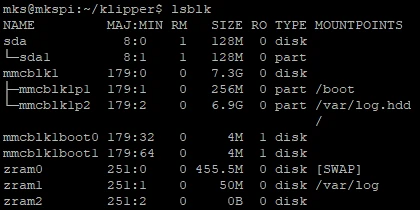
To flash the katapult bootloader, use the commands below, replacing your partition name if it is different from sda1 :
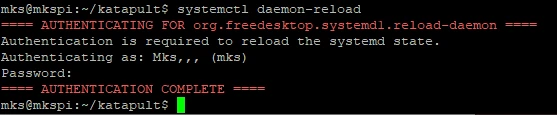
sudo mount /dev/sda1 /mnt
systemctl daemon-reload

You will be asked to authenticate by entering the password:
Now flash katapult to the RP2040 and unmount it:
sudo cp out/katapult.uf2 /mnt
sudo umount /mnt
To confirm your Katapult flash was successful, run:
ls /dev/serial/by-id/*

Alternative Method for X3 series:
Put the toolhead board in DFU mode by doing this:
- Remove the back cover of your toolhead.
- Press and hold the "boot“ button.
- Press and release the "reset“ button.
- Release the "boot“ button.
Confirm that your toolhead is in BOOT/DFU mode by running:
lsusb
You should see this:

To flash the katapult bootloader, run:
cd ~/katapult
make flash FLASH_DEVICE=2e8a:0003
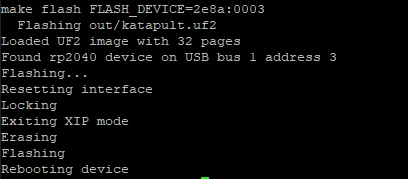
To confirm your Katapult flash was successful, run:
ls /dev/serial/by-id/*
Flashing katapult on Q1 pro:
Put the toolhead board in DFU mode by doing this:
- Remove the back cover of your toolhead.
- Press and hold the "boot“ button.
- Press and release the "reset“ button.
- Release the "boot“ button.
Then run these commands:
sudo service klipper stop
sudo apt install stlink-tools
sudo cp ~/katapult/out/katapult.uf2 /dev/sda1
Flashing katapult on Plus 4:
Put the toolhead board in DFU mode by doing this:
- Remove the back cover of your toolhead.
- Press and hold the "boot“ button.
- Press and release the "reset“ button.
- Release the "boot“ button.
Then to flash the katapult bootloader, run:
sudo service klipper stop
sudo apt install stlink-tools
st-flash write ~/katapult/out/katapult.bin 0x8000000
Bonus!
- Benefits of Katapult:
- Pressing the BOOT + RESET buttons IS NOT NEEDED ANYMORE!
- Q1 pro: NO USB breakout NEEDED ANYMORE!
- Plus 4: NO ST-Link v2! NEEDED ANYMORE!
Yes — those "extra" wiring & manual intervention steps are gone, making your experience easier!
Flashing klipper in your toolhead
Now it's time to build then flash the latest klipper inside your toolhead.
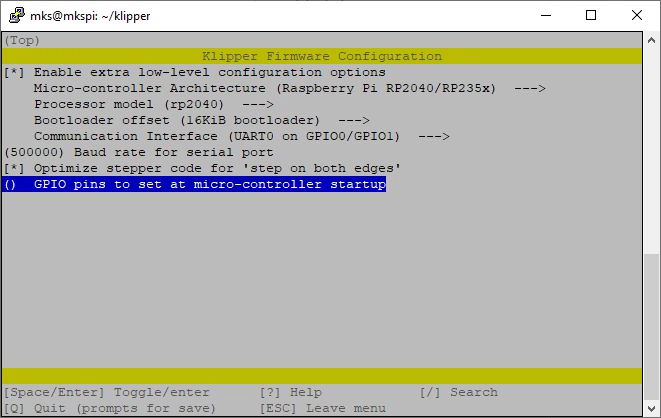
Flashing Klipper on 3 Series:
- Compile the toolhead board firmware with:
cd ~/klipper
make menuconfig
Set it according to the screenshot below:
Save and exit with Q then Y
Then run:
make clean
make -j4
This generates a klipper.uf2 file in ~/klipper/out/.
- Find your toolhead ID with:
ls /dev/serial/by-id/*

- Flash your toolhead with Katapult, replacing the ID with yours:
sudo service klipper stop
python3 ~/katapult/scripts/flashtool.py -f ~/klipper/out/klipper.bin -d /dev/serial/by-id/usb-katapult_rp2040_C5DA4D951E145858-if00
- If the update is successful, you should see this:
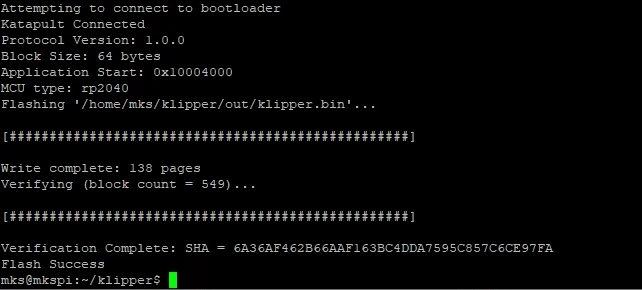
To confirm your Klipper flash was successful, run:
ls /dev/serial/by-id/*

- Restart Klipper:
sudo systemctl start klipper
Flashing Klipper on Q1 pro :
- Compile the toolhead board firmware with:
cd ~/klipper
make menuconfig
Set it according to the screenshot below:
Save and exit with Q then Y
Then run:
make clean
make -j4
- Flash your toolhead with Katapult:
sudo service klipper stop
python3 ~/katapult/scripts/flashtool.py -d /dev/ttyS2 -f ~/klipper/out/klipper.bin
-
If the update is successful, you should see this:
-
Restart Klipper:
sudo systemctl start klipper
Flashing Klipper on Plus 4:
- Compile the toolhead board firmware with:
cd ~/klipper
make menuconfig
Set it according to the screenshot below:
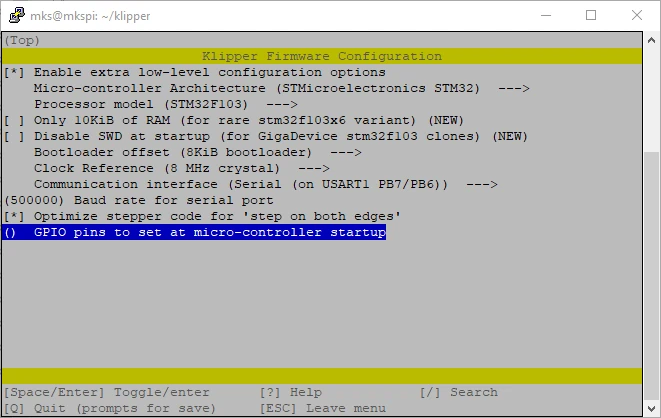
Save and exit with Q then Y
Then run:
make clean
make -j4
- Flash your toolhead with Katapult:
sudo service klipper stop
python3 ~/katapult/scripts/flashtool.py -b 250000 -d /dev/ttyS2 -f ~/klipper/out/klipper.bin
-
If the update is successful, you should see this:
-
Restart Klipper:
sudo systemctl start klipper
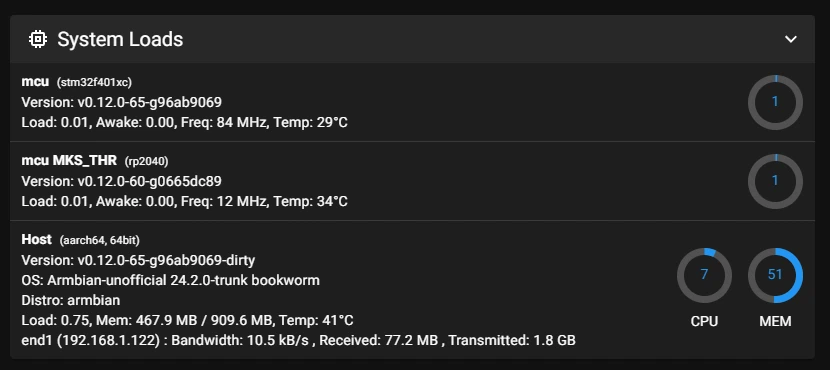
Now if you go to the machine settings of mainsail, you will see the current klipper version of the sub systems: