Input Shaping
What is this about?
Calibrating Input Shaping helps reduce vibration artifacts (ringing/ghosting) and improves print quality, especially at higher speeds.
Info
Quick Context: Input Shaping compensates for mechanical resonances in your printer. This step measures your printer's vibrations and applies software corrections to eliminate ringing and ghosting in your prints. It takes about 10 minutes and should be done after Z-offset calibration.
What are we doing now?
In this step you let the printer measure its own mechanical resonances (the timing belts acts like springs) so that klipper can apply the right Input Shaping parameters for your X and Y axes. Once done, these settings are stored in your configuration and automatically used for all future prints.
What Happens During Calibration?
During Input Shaping calibration:
- The printer homes all axes
- The toolhead moves to the center of your printbed and then moves rapidly back and forth along the X-axis at different frequencies
- When done, it does the same for the Y-axis
- The accelerometer measures vibrations during these movements
- Klipper calculates the best Input Shaping parameters based on the measured data
- The results are saved to the auto-generated section at the end of
printer.cfg
Don't worry:
This is normal to hear the printer rumble. Input Shaping calibration requires rapid movements to measure resonances. The noise will last for 5 minutes only.
Prerequisites
- Printer homed and ready
- No prints currently running
- Time required: ~5 minutes
Methods to Perform Input Shaping Calibration
There are three ways to run Input Shaping calibration. All methods perform the same calibration - they only differ in how you start it.
Method 1: Using the Display Menu (Recommended)
This is the easiest method for most users.
- On the printer display, go to: Gear Icon → Advanced → Next Page → Input Shaping
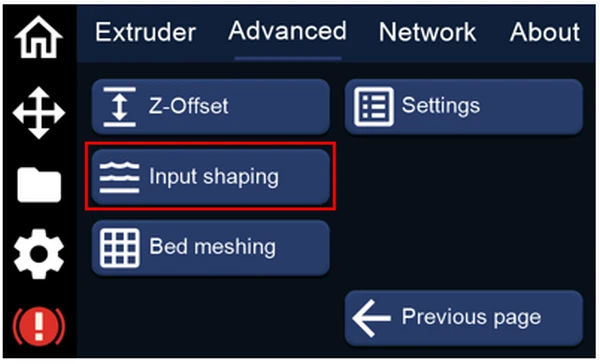
- Once calibration is complete, the measured shaper settings for the X and Y axes are automatically saved to your
printer.cfg
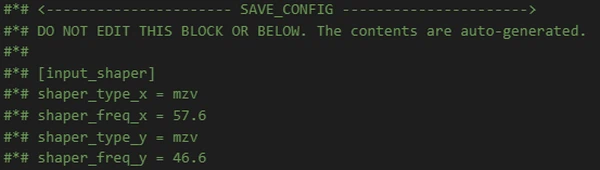
The settings will look similar to this:
Method 2: Using the Console in Mainsail
If you prefer using commands:
-
Open the Console in Mainsail
-
Enter the following command:
INPUT_SHAPING_CALIBRATE
-
The printer will home and run through the motion pattern needed to measure resonances
-
Wait for the calibration to complete (5-10 minutes)
-
The settings are automatically saved to your
printer.cfg
Method 3: Using a Macro in Mainsail
You can also start the Input Shaping calibration using a macro button in Mainsail:
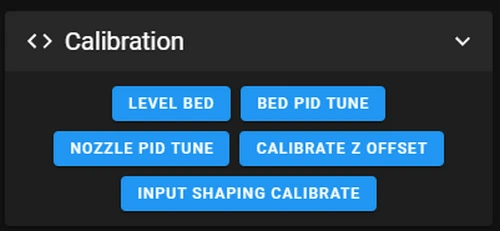
-
Click the INPUT SHAPING CALIBRATE macro button
-
The process is the same as Method 2
Verification
After calibration:
- Open Mainsail and navigate to Configuration → printer.cfg
- Scroll to the bottom of the file
- You should see a section like this:
Good values:
- Shaper frequencies typically range from 30-80 Hz
- Shaper types are usually:
mzv,ei,2hump_ei, or3hump_ei
If you see these values, your calibration was successful!
When to Recalibrate
You should recalibrate Input Shaping if:
- You make mechanical changes (tighten belts, adjust frame, change toolhead)
- You notice ringing/ghosting returning in your prints
- You upgrade or replace major components
Otherwise, the calibration remains valid indefinitely.
Should I recalibrate after every print?
Answer: No!!!
Input Shaping calibration only needs to be done once, or after significant mechanical changes like tightening belts, changing the frame, or moving the printer!
By following one of these methods, you can successfully calibrate Input Shaping for your printer, improving overall print quality and reducing artifacts caused by vibrations.