X3 series Rollback
This section describes the procedure and some things to look for when restoring the stock system on your QIDI X3 series printer (X-Smart3/X-Plus3/X-Max3).
Before we start:
Some users switch to FreeDi hoping it will resolve hardware issues with their printer.
Unfortunately, this is not something FreeDi can fix: It is a software project, not a hardware solution.
After realizing this, some users become frustrated and send unkind messages because reverting to stock firmware is not as streamlined (with a nice on screen wizard etc.) like installing FreeDi. Please keep in mind:
- FreeDi is a completely free project that has cost thousands of hours of personal free time.
- This rollback guide you are reading right now and the precompiled stock firmwares provided here also required many hours of additional work - work that was never intended to be part of this project.
- The stock-compatible Klipper firmwares were created by manually installing the stock firmware and building the necessary firmware files by myself to provide the precombiled binaries for you.
This effort deserves recognition. Please be respectful and maintain a friendly tone.
Unkind messages are not acceptable, regardless of your frustration.
If you are having a hard time rolling back, simply get in touch with us - preferably on Discord - and we can help you out 😊.
Overview
To complete the rollback to stock firmware:
you will need to perform the following steps:
- Flash Stock Display Firmware - Restore the touchscreen interface to QIDI's original firmware
- Flash Precompiled Toolhead MCU Firmware - Restore the toolhead microcontroller firmware
- Flash Precompiled Mainboard MCU Firmware - Restore the mainboard microcontroller firmware
- Flash Stock Operating System to eMMC - Install QIDI's original OS onto the internal storage
Flashing the Display Firmware
Download the QIDI TFT Firmware
X-Smart3 owners:
Download the QIDI TFT Firmware. It is hidden in the SMART_V4.1.13.rar of one specific release only.
Unzip it and find the xindi_480_272.tft file.
Rename it to stock_firmware.tft to follow this guide.
X-Plus3 owners:
Download the QIDI TFT Firmware. You can find it in QIDI's Plus3 repository.
Download the 800_480_PLUS.tft as Raw file (Important! Really use Raw file to download it 😉)
Rename it to stock_firmware.tft to follow this guide.
X-Max3 owners:
Download the QIDI TFT Firmware. It is hidden in one specific branch only.
Download the 800_480_PLUS.tft as Raw file (Important! Really use Raw file to download it 😉)
Rename it to stock_firmware.tft to follow this guide.
Copy the firmware to the printer
Transfer the downloaded TFT firmware to your FreeDi installation folder (~/FreeDi/screen_firmwares/). You can do this using WinSCP or MobaXterm.
If you already have the firmware file on your printer, you can copy it using the following command:
cp /path/to/downloaded/stock_firmware.tft ~/FreeDi/screen_firmwares/
Find the latest FreeDi display firmware version
Here is the trick: We will use the FreeDi software pipeline to flash the stock screen firmware to the display.
To do so, we need to know the latest FreeDi version on your system.
Check the ~/FreeDi/screen_firmwares/ directory and find the latest FreeDi version of your printer.
The filenames look like this:
x-smart3_stable_v2.00.tft
x-smart3_stable_v2.01.tft
x-plus3_x-max3_plus4_stable_v2.00.tft
x-plus3_x-max3_plus4_stable_v2.01.tft
q1_pro_stable_v2.00.tft
q1_pro_stable_v2.01.tft
Search for the most recent version of your printer.
In this guide we are using x-plus3_x-max3_plus4_stable_v2.10.tft as an example and you have to adapt the commands to your file name.
Stop the FreeDi Service
Before flashing the new firmware, stop the FreeDi service:
sudo systemctl stop FreeDi
(Optional) Backup your existing Firmware
It is good practice to make a backup of the current FreeDi firmware in case you want to revert back. You can do this with the following command:
mv ~/FreeDi/screen_firmwares/x-plus3_x-max3_plus4_stable_v2.10.tft ~/FreeDi/screen_firmwares/x-plus3_x-max3_plus4_stable_v2.10.tft.bak
Rename the QIDI firmware to Match the FreeDi firmware name
Rename the QIDI firmware file to match the existing FreeDi firmware filename:
mv ~/FreeDi/screen_firmwares/stock_firmware.tft ~/FreeDi/screen_firmwares/x-plus3_x-max3_plus4_stable_v2.10.tft
Force Flash the Firmware to the TFT Display
Navigate to the FreeDiLCD directory and force flash the firmware to the display:
cd ~/FreeDi/FreeDiLCD && sudo ~/klippy-env/bin/python3 start.py -debug -force_flash
This command will use my FreeDi software to flash the stock firmware to the TFT display.
Wait for the process to complete (approximately 8-10 minutes).
IMPORTANT
- If the flashing gets stuck or errors occur, power cycle the printer and it the flashing process should restart automatically.
- It may take several tries before the printer succeeds in flashing the firmware (reason is the weak serial hardware).
If successful, the display should show the stock firmware version and likely show the error "THE SYSTEM STARTS ABNORMALLY".
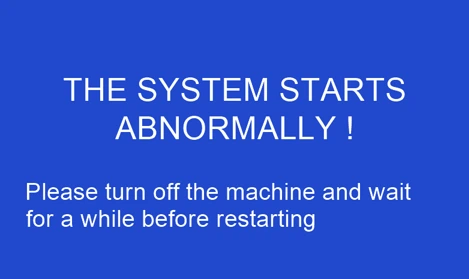
This is expected behavior because the screen firmware is now stock and can't get find the stock QIDI software on the system.
Getting the precompiled firmware binaries
Now that the display is flashed, it is time to get the firmware binaries for the mainboard and the toolhead.
Please find the attached X3_stock_firmwares.zip file:
Download X3_stock_firmwares.zip
Unzip the files.
You will find a X_4.bin and a x3_series_toolhead_stock_klipper_CLKDIV4.uf2.
They are precompiled firmware binaries for the mainboard and the toolhead that I created to match the stock klipper version.
Copy the x3_series_toolhead_stock_klipper_CLKDIV4.uf2 file to the ~/ directory using WinSCP/MobaXterm or something similar.
We will need the X_4.bin later.
Flashing the Toolhead MCU Firmware
We need to bring the toolhead into "RP2 Boot" mode.
Remove the back cover of the toolhead.
Find the RESET and BOOT buttons.
Here is an example image to help you locate the buttons:
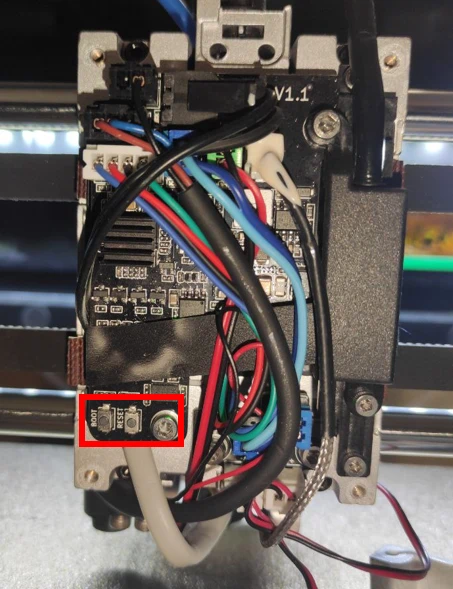
It might look different for your toolhead, as different revisions have been installed in the machines.
To put the toolhead into "RP2 Boot" mode, follow one these steps (whatever is easier for you):
- Press and hold the „BOOT“ button.
- Press and release the „RESET“ button.
- Release the „BOOT“ button.
OR
- Shut off the printer.
- Press and hold the boot button.
- Switch the printer on and then release the boot button.
Verify if its really in "RP2 Boot" mode. You can do this by connecting via ssh to the printer and run:
lsusb
This means it is in boot mode:

This means it NOT in boot mode:

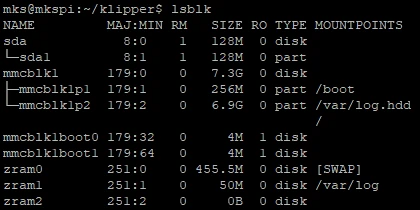
Run lsblk and see if you can find a partition at 128MB size:
lsblk
This means it is in boot mode and the partition is sda1:
This means it NOT in boot mode:
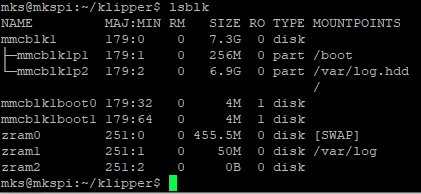
If thats the case, go back and repeat the steps to put the toolhead into "RP2 Boot" mode.
IMPORTANT
Make sure you use the correct partition in the next command. In this example it is sda1. In some cases it might be sda2, sda3 or sdb1, sdc1 etc.
Flash the toolhead by running the next command with the correct partition:
sudo cp ~/x3_series_toolhead_stock_klipper_CLKDIV4.uf2 /dev/sda1
Shut the system down (sudo shutdown) and shut it off (switch off).
Flashing the Mainboard MCU Firmware
To flash the mainboard MCU, copy the X_4.bin firmware file to a microSD card.
The printer should still be turned off, if not -> do it now.
Insert microSD card into the printer's mainboard.
Turn the printer on and wait ~10s for the flashing process to complete and then shut down the printer.
IMPORTANT
- The microSD card must be formatted in FAT32 and have no hidden partitions. FAT16 or ExFAT will likely fail.
- The partition must also be smaller than 32GiB.
- TIP: to verify that the flashing procedure succeeded, chech that the firmware file has been renamed on the microSD to
X_4.CUR.
Troubleshooting
If the TFT display remains stuck during the flashing process, restart the printer and try again.
I also want to mention the nice guide of my buddy billkenney who created the revert_qidi_software project and the qidi_3series_recovery project.
If any issues persist, get in touch with the FreeDi community for assistance.*