Cartographer probe
Requirements:
-
You must be running FreeDi to use this guide.
-
This guide is for X-Max 3, but the same logic applies to every other printers: just be careful to find the correct values if you're not a X-max3 owner.
Tip
Save your printer.cfg & your macro.cfg somewhere. Name it something that makes sense.
You will be thankful you did this later when you get completely upside-down trying to get your Cartographer to work, and you just want to get back to printing some articulated dragon.
Mount & Tool
Mount your Cartographer probe. It needs to be 2.6 to 3.0 mm above your nozzle.
Here are some links for Cartographer mounts for QIDI printers from Printables:
If you are unsure if you are 2.6mm - 3.0mm above the nozzle, you can print this file from Printables, with a fine layer height to take measurements:
Cartographer official guide
Cartographer 3D has a well detailed guide about all the installation and configuration process.
warning:
As you already know, FreeDi is based on mainline klipper. So please follow the official guide, like any other printer. NOT THE QIDI SPECIFIC guide.
Follow the guide here on their Official Cartographer Documentation
Klipper Configuration
Editing printer.cfg
Below are the configuration changes needed inside your printer.cfg when using a Cartographer probe on QIDI X-max 3.
Comment out the entire [probe] section !
Tip: when editing .cfg files inside Mainsail, select all the lines then press Ctrl+/ . This will comment out all the lines at once!
[safe_z_home] section
[safe_z_home]
home_xy_position: 162.5,162.5
z_hop: 10
[stepper_z] section
endstop_pin: probe:z_virtual_endstop
homing_retract_dist: 0 # cartographer needs this to be set to 0
[mcu cartographer] section
Find you serial ID by running:
ls /dev/serial/by-id/
[mcu cartographer]
serial:
restart_method: command # Not needed for probes using CAN.
[cartographer] section
[cartographer]
mcu: cartographer
x_offset: 0
y_offset: 25
verbose: no
[bed_mesh] section
[bed_mesh]
zero_reference_position: 162.5, 162.5 # center of your bed
Speed:500
Horizontal_move_z: 5
mesh_min: 25,18 # Minimum position of the detection point
mesh_max: 305,300 # Maximum position of the detection point
probe_count: 30,30 # Number of measuring points
adaptive_margin: 10
mesh_pps: 0,0 # Disable interpolation - mesh is probably dense enough
[temperature_sensor cartographer] section
[temperature_sensor cartographer]
sensor_type: temperature_mcu
sensor_mcu: cartographer
min_temp: 5
max_temp: 105
[adxl345] section
I kept my stock ADXL345 sensor settings. But if you want to use the Carto ADXL, comment out the stock section then use:
# CARTOGRAPHER ADXL345
[adxl345]
cs_pin: cartographer:PA3 # For Cartographer V3
cs_pin: cartographer:PA0 # For Cartographer V4
spi_bus: spi1
Now reboot your printer.
Adjusting the manual bed leveling macro
If you use screws_tilt_adjust to level your bed, you will need to modify your printer.cfg file since the probe is in a different location now:
screws_tilt_adjust:
[screws_tilt_adjust]
#horizontal_move_z: 5
screw_thread: CCW-M4
speed: 300
# modified for Cartographer
#screw1: 8,32
screw1: 36, 9
screw1_name: front left screw
#screw2: 264,32
screw2: 290, 9
screw2_name: front right screw
#screw3: 264,286
screw3: 290,264
screw3_name: rear right screw
#screw4: 8,286
screw4: 36,264
screw4_name: rear left screw
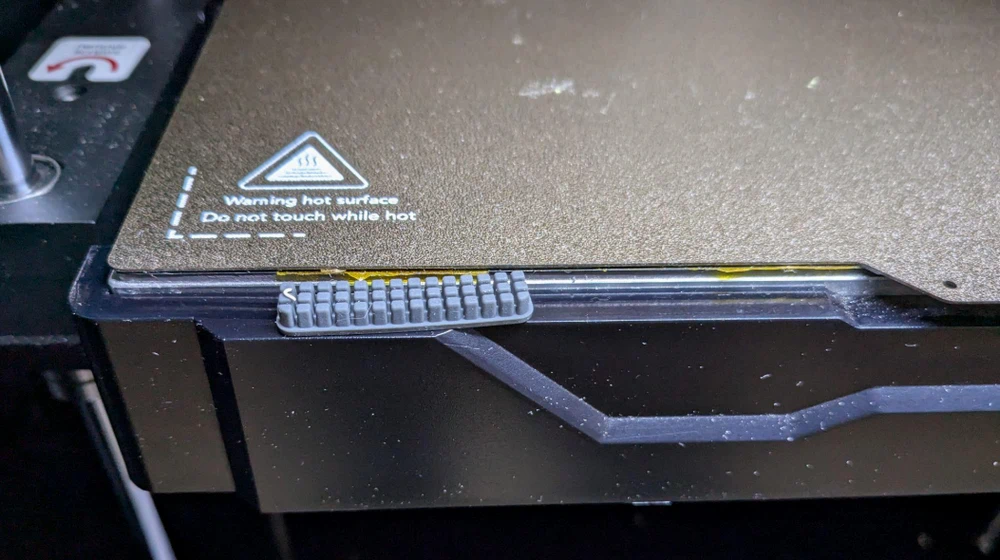
Macro for nozzle brushing
Don't forget that the nozzle needs to be clean for the TOUCH calibration. I added the silicon brush sent with the Cartographer and stuck it on the plastic housing in front of the bed plate. I then modified the G29 macro to heat the nozzle and brush between the BED_MESH_CALIBRATE and the CARTOGRAPHER_TOUCH commands.
If you want to do this, take your time and make sure you are not going to hit the bed with the nozzle/hotend.
modified G29 macro:
Here's my modified G29 for nozzle brush:
[gcode_macro G29]
variable_k:1
gcode:
{% if k|int==1 %}
 BED_MESH_CLEAR
; Clear levelling data
 BED_MESH_CALIBRATE ADAPTIVE=1 ADAPTIVE_MARGIN=5 ; Start adaptive meshing
 #BED_MESH_CALIBRATE
 ; Nozzle silicone brush wipe section
 M109 S150
 G0 X25 Y-7 Z5 F10000 ; move over silicone brush
 G0 X25 Y-7 Z-0.5 F10000 ; drop down below bed
 G0 X55 Y-6 Z-0.5 F10000 ; brush right
 G0 X25 Y-6 Z-0.5 F10000 ; brush left
 G0 X55 Y-7 Z-0.5 F10000 ; brush right
 G0 X25 Y-7 Z-0.5 F10000 ; brush left
 G0 X55 Y-7 Z-0.5 F10000 ; brush right
 G0 X25 Y-6 Z-0.5 F10000 ; brush left
 G0 X55 Y-6 Z-0.5 F10000 ; brush right
 G0 X25 Y-7 Z-0.5 F10000 ; brush left
 G0 X25 Y-7 Z5 F10000 ; rise up above bed    [scanner]
 G0 X162.5 Y162.5 Z5 F10000 ; move to center
 ; End Nozzle silicone brush wipe section
 CARTOGRAPHER_TOUCH
{% endif %}
Links
Official cartographer installation guide
Official cartographer troubleshooting guide
cartographer installation guide on Vanilla klipper