FAQ & Troubleshooting
General Issues
Screen update gets stuck during firmware update
Guidelines:
It can occasionally happen that the flash process gets stuck. This problem is known and is caused by a serial overload during the flash process.
In this case, please simply switch off the printer and switch it on again. FreeDi will detect the corrupted screen firmware and start to flash the firmware again.
Note: Sometimes it needs several attempts.
I updated, but something isn't working any more
Guidelines:
When I release a new version, you will find them in the release section.
Normally you will find important release information there such as update and install notes.
Sometimes there will be even announcements at the issues section that additionally will pop up on your Mainsail notification bell.
Check this first before you update - that's why I use announcements!
In any case: Check if the additional information/instructions I gave solves your problem.
If not, contact the community on discord or open an issue or a discussion here on git.
I have installed/updated something, now FreeDi or screen doesn't work
Guidelines:
- If you see a log/debug message saying:
Firmware update failed: SerialBase.read_until() got an unexpected keyword argument 'expected'
It tells you that you installed an older version of pyserial.
You must have at least pyserial v3.5 for FreeDi to work.
To solve this, please install pyserial 3.5 (or higher) by doing this:
/home/mks/klippy-env/bin/python3 -m pip install pyserial==3.5
If you updated klipper:
If you updated klipper, it will delete the klipper klippy/extras folder and break symlinks by that.
On FreeDi v2.03 and later I included an auto-repair-mechanism for that.
Everyone can simply run the installation script to fix this:
cd ~/FreeDi && ./install.sh
How do I reinstall FreeDi?
Guidelines:
Simply run this command, to delete, download and install FreeDi again:
cd ~ && rm -rf FreeDi && git clone https://github.com/Phil1988/FreeDi ~/FreeDi && cd ~/FreeDi && ./install.sh
Update Problems
I think I can't update to the latest version of FreeDi
Guidelines:
On some installations it can occasionally happen that your local git doesn't fetch the right tags or heads.
For v2.00 if you see this:

It means that you are still on v1.42.
To check it yourself, you can go to the commits and check the number you are seeing.
In the example the commit 30c9b57 is not the latest and was pre v2.00:
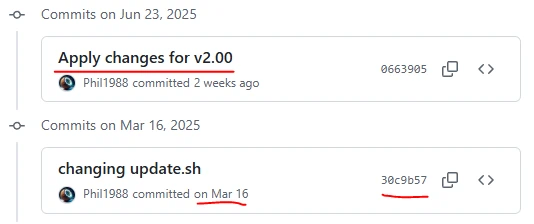
There is no such a thing as "do always this and it fixes it for you" and you need to check why it is not seeing the latest update with:
cd ~/FreeDi
git remote -v
git remote show origin
git config --get-all remote.origin.fetch
git rev-parse --abbrev-ref --symbolic-full-name @{u}
In most cases this will be enough to fetch the missing tags:
cd ~/FreeDi
git fetch --tags
Some don't see the branch refspec and need to add this:
cd ~/FreeDi
git config --add remote.origin.fetch "+refs/heads/*:refs/remotes/origin/*"
git config --add remote.origin.fetch "+refs/tags/*:refs/tags/*"
git fetch origin
I think I can't update to the latest version of Klipper
There are 2 reasons:
-
The Update Manager only lists "stable" updates. If you really want to go to the latest "edge"/developer versions you can use the installed KIAUH, but I do not recommend it, as it often includes bugs.
-
Your local klipper git might be damaged (reasons can be various because git can be a rabbit hole).
To check that, ssh into your printer:
The following commands help you to analyze the status. There is one "fixing way" at the end that resets your klipper repo - but it may be better to check and understand what is causing this first. For that please also get some help if you are not familiar with this.
Change to the klipper dir:
cd ~/klipper
git status
git remote -v
git log --oneline --decorate -n 5
git describe --always --tags --long --dirty
git fetch origin
git ls-remote origin
Fixing the local klipper repo:
Caution!
I do not recommend to do this blindly as it might be useful to understand first what is causing the issue on your local klipper repository.
By this your will reset your local klipper and overwrite it with the latest remote version of mainline klipper from its official repository:
Switch the current branch to the main development branch:
git checkout master
git reset --hard origin/master
To make your machine fully functional, you might need some extra modules that klipper doesnt include.
As part of this project, I have created the necessary modules for the supported printer models.
The easiest way to install them is via the install script. Start the install script and follow the instructions.
You will need to answer a few questions about your setup or enter the sudo password (default “makerbase”):
cd ~/FreeDi && ./install.sh
I installed additional software (shaketune, etc.) and FreeDi doesn't start since
Guidelines:
Some programs (especially shaketune) have been reported to cause problems. The reason is that FreeDi starts after Moonraker has been started, but other software cause moonraker to have a slower start or make it get "ready" at a later point. To overcome this, please increase the starting delay of FreeDi to make sure it starts when moonraker is really "ready".
Please do this:
sudo nano /etc/systemd/system/FreeDi.service
ExecStartPre=/bin/sleep 15
Hardware-Specific Issues
My toolhead is only visible when in boot mode
Info
This affects about 0.5% of users with a RP2040 toolhead MCU. The standard clock seems to be too fast for them, that's why CLKDIV4 needed to be used on klipper v0.12 (on FreeDi v1.x).
For some reason this doesn't even work any more on klipper 0.13.0-154. There is no higher divider selectable on the menuconfig pre-compiling, so I made a "special" version for those affected.
For X3 series on FreeDi 2.00 only:
-
Put your toolhead in boot mode: Remove back cover, hold boot, click reset, release both
-
stop klipper so the USB device is free
sudo systemctl stop klipper.service -
unmount if it happens to be mounted; message will show if not mounted
sudo umount /flash_mount sudo umount /dev/sda1 -
run lsblk and look for the UF2 drive with 128MB size (e.g. /dev/sda1)
lsblk -o NAME,SIZE,LABEL,MOUNTPOINT -
create mount point mount the Toolhead - ATTENTION! Check and adjust the path /dev/sda1
sudo mkdir -p /flash_mount sudo mount /dev/sda1 /flash_mount -
check that the drive is readable
ls /flash_mount/INFO_UF2.TXT -
THE FIRST IMPORTANT STEP: erase the current_firmware
sudo cp ~/FreeDi/mainboard_and_toolhead_firmwares/v0.13.0-154/flash_nuke.uf2 /flash_mount -
create mount point mount the Toolhead - ATTENTION! Check and adjust the path /dev/sda1
sudo mkdir -p /flash_mount sudo mount /dev/sda1 /flash_mount -
check that the drive is readable
ls /flash_mount/INFO_UF2.TXT -
THE SECOND IMPORTANT STEP: write my special klipper version:
sudo cp ~/FreeDi/mainboard_and_toolhead_firmwares/v0.13.0-154/Toolhead_X3.uf2 /flash_mount -
unmount if it happens to be mounted; message will show if not mounted
sudo umount /flash_mount
sudo umount /dev/sda1
For Q1 Pro on FreeDi 2.00 only:
- Please download these 2 files and extract them:
SPECIAL_klipper_v0.13.0-154.zip
-
Upload the *.uf2 firmwares to your /home/mks/ folder
-
Put your toolhead in boot mode: Remove back cover, hold boot, click reset, release both
-
stop klipper so the USB device is free
sudo systemctl stop klipper.service -
unmount if it happens to be mounted; message will show if not mounted
sudo umount /flash_mount sudo umount /dev/sda1 -
run lsblk and look for the UF2 drive with 128MB size (e.g. /dev/sda1)
lsblk -o NAME,SIZE,LABEL,MOUNTPOINT -
create mount point mount the Toolhead - ATTENTION! Check and adjust the path /dev/sda1
sudo mkdir -p /flash_mount sudo mount /dev/sda1 /flash_mount -
check that the drive is readable
ls /flash_mount/INFO_UF2.TXT -
THE FIRST IMPORTANT STEP: erase the current_firmware
sudo cp ~/flash_nuke.uf2 /flash_mount -
create mount point mount the Toolhead - ATTENTION! Check and adjust the path /dev/sda1
sudo mkdir -p /flash_mount sudo mount /dev/sda1 /flash_mount -
check that the drive is readable
ls /flash_mount/INFO_UF2.TXT -
THE SECOND IMPORTANT STEP: write my special klipper version:
sudo cp ~/SPECIAL_klipper_v0.13.0-154.uf2 /flash_mount -
unmount if it happens to be mounted; message will show if not mounted
sudo umount /flash_mount
sudo umount /dev/sda1
Browser & Network Issues
Safari shows "connecting to..." and gets stuck (macOS/iOS)
Option 1 - Quick Fix - HTTPS Only (Port 443)
Problem: Safari on macOS 26.3 (Tahoe) and iOS 26.2 has known bugs with HTTP WebSocket connections. Users see "connecting to XXX.XXX.XXX.XXX" and need to use Cmd+Option+R (force reload) every time to access Mainsail.
Root Cause: Safari sends incorrect CONNECT requests instead of proper WebSocket upgrade requests when using HTTP. HTTPS resolves this issue.
Quick Workaround (not recommended): Continue using HTTP and press Cmd+Option+R every time you reload the page in Safari.
Option 1 - Quick Fix:
Download the file: mainsail.zip
Installation:
Upload the mainsail file to your home directory (~/) using WinSCP or similar tool Connect via SSH and run:
-
Backup your current config
sudo cp /etc/nginx/sites-available/mainsail /etc/nginx/sites-available/mainsail.backup -
Replace with new config
sudo cp ~/mainsail /etc/nginx/sites-available/mainsail sudo chown root:root /etc/nginx/sites-available/mainsail sudo chmod 644 /etc/nginx/sites-available/mainsail - Test and reload nginx
sudo nginx -t
sudo systemctl reload nginx
Important: Users must now access Mainsail via https://XXX.XXX.XXX.XXX instead of http://XXX.XXX.XXX.XXX. Update your slicer connection settings accordingly.
To restore if needed:
sudo cp /etc/nginx/sites-available/mainsail.backup /etc/nginx/sites-available/mainsail
sudo systemctl reload nginx
Option 2 - Complete Solution - Enable HTTPS with HTTP redirect (Recommended)
This solution enables HTTPS with automatic HTTP-to-HTTPS redirect, so users can still type http://XXX.XXX.XXX.XXX and will be automatically redirected to the secure connection. No slicer configuration changes needed.
Trade-off: All browsers (Safari, Chrome, Firefox, Edge) will show a "Your connection is not private" security warning on first visit only because we use a self-signed certificate. Users click "Advanced" → "Continue" once, then everything works normally. This one-time warning affects all users equally, whereas the HTTP-only approach permanently breaks Safari.
Why the warning? The self-signed certificate warning is unavoidable without a trusted CA-signed certificate, which requires a public domain (not feasible for local IP addresses).
Option 2 - Complete Solution:
Download the file: Safari_fix.zip
This zip contains:
- mainsail - nginx configuration
- nginx-selfsigned.crt - SSL certificate (10 year validity)
- nginx-selfsigned.key - SSL private key
Installation:
-
Upload all three files to your home directory (~/) using WinSCP or similar tool
-
Connect via SSH then:
-
Backup your current config
sudo cp /etc/nginx/sites-available/mainsail /etc/nginx/sites-available/mainsail.backup -
Copy Mainsail config
sudo cp ~/mainsail /etc/nginx/sites-available/mainsail sudo chown root:root /etc/nginx/sites-available/mainsail sudo chmod 644 /etc/nginx/sites-available/mainsail -
Copy SSL Key
sudo cp ~/nginx-selfsigned.key /etc/ssl/private/nginx-selfsigned.key sudo chown root:root /etc/ssl/private/nginx-selfsigned.key sudo chmod 600 /etc/ssl/private/nginx-selfsigned.key -
Copy SSL Certificate
sudo cp ~/nginx-selfsigned.crt /etc/ssl/certs/nginx-selfsigned.crt sudo chown root:root /etc/ssl/certs/nginx-selfsigned.crt sudo chmod 644 /etc/ssl/certs/nginx-selfsigned.crt -
Test and reload nginx
sudo nginx -t sudo systemctl reload nginx -
Test in browser:
Open http://XXX.XXX.XXX.XXX (your printer IP) in any browser.
You'll be automatically redirected to https:// and see a security warning on first visit.
Click "Show Details" / "Advanced" → "Visit this website" / "Continue".The Safari WebSocket problem is now fixed!
To restore if needed:
sudo cp /etc/nginx/sites-available/mainsail.backup /etc/nginx/sites-available/mainsail
sudo systemctl reload nginx
Known bugs
- If you home your printer and restart klipper, the buttons on the screen don't turn back to gray
- You can't connect to a Wi-Fi with hidden SSID
- You can't connect to an open/unprotected Wi-Fi
- Re-entering the "Network" menu might show an incorrect Wi-Fi list until you refresh it